
May 3, 2024

July 7, 2022

June 24, 2022

January 24, 2022

October 28, 2021

November 26, 2018

July 8, 2019

June 9, 2017

September 22, 2017

September 27, 2017

July 24, 2017
September 22, 2017
September 27, 2017
November 26, 2018

January 30, 2019
Thermal Conductivity is an important material property in industry and daily situations like knowing what to choose in cookware or the proper clothing worn to leave the house. This property is described in units of Watts per meter Kelvin and at steady state can be calculated via a measurement of thermal resistance. Both Thermal Conductivity and Thermal Resistance will affect the amount of heat which passes through a system. In this experiment, a simple set-up will be employed to observe the change in heat flow.
The goal of this experiment is to demonstrate the effect which varying thermal conductivities have on the heat flow through a given material. Ultimately this will provide a better understanding of both thermal conductivity and thermal resistance
Thermal Conductivity is a measure of a materials ability to transfer heat through itself and is one of the 3 variables in Thermal resistance. Thermal Resistance is analogous to Electrical Resistance in that it is inversely proportional to the flow of heat. In a laboratory setting, thermal resistance is calculated under specific circumstances allowing for thermal conductivity to then be derived from the obtained results.
Heat Flow Equation Q = ΔT / RΘ
This experiment will vary the bolded constant via different samples.
This experiment was designed to compare thermal conductivities thus surface area, length and temperature difference must remain the same in every test. One may use non-metals for this experiment however, may run the risk of lengthy testing time or potential incompletion. It is therefore suggested that metals be used. A listing of common metals may be found in the comparison section.
| Material | Price | Location of Purchase |
|---|---|---|
| Wiring (Same Diameter, 1.1m) •Copper •Aluminum •Steel |
Between 5-10$ each, 15-30$ total. | Amazon |
| Candles x15 | 1$ | Amazon |
| Infrared Thermometer | 23$ | Amazon |
| Beaker x2 (50ml) | 3$ | Indigo Instruments |
| Ruler | 2$ | Amazon |
| Hot Plate | 15$ | Amazon |
| Stop Watch | 4$ | Amazon |
| Total | 63-78$ |
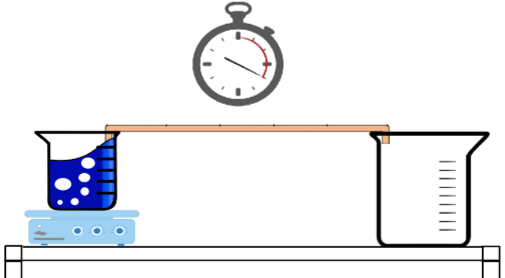
*shorter wires may be used for a faster experiment time if needed, simply make a measurement at every 1/5th of the wire*
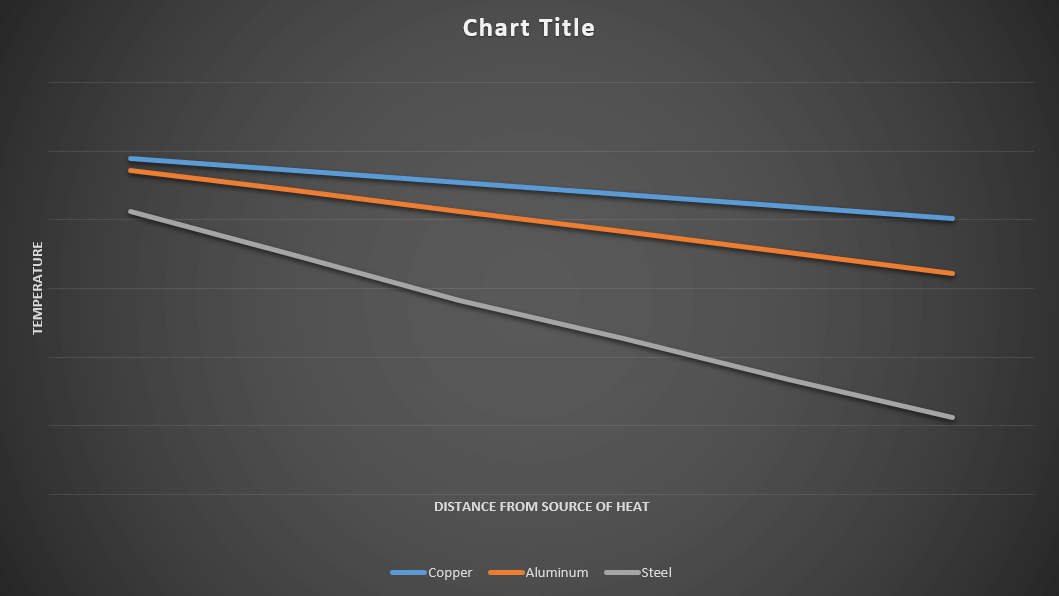
There are two ways one can visualize the progression of the heat through the wires. Initially, one can observe the degree to which the candles melted at each 200mm interval. The wire with the highest thermal conductivity will have the greatest severity of melted candle, whereas; the wire with the lowest thermal conductivity will have the weakest severity of melted candles near the heat source. One can also use an Infrared Thermometer to measure each 200mm interval along the wire and plot the recorded data against the distance from the boiling water. The plot with the greatest difference from between 0mm and 1000mm will most likely be the worst thermal conductor. The produced plot should look similar to the one below.
Below is a list of metals along with their thermal conductivity value. The higher the thermal conductivity value, the better thermal conductor that material will be.
| Material | Thermal Conductivity Value (W/m⋅K) |
|---|---|
| Copper | 397.48 |
| Aluminum | 225.94 |
| Tungsten | 196.65 |
| Zinc | 111.8 |
| Bronze | 104.6 |
| Nickel | 87.86 |
*For other thermal Conductivity Value visit: https://thermtest.com/materials-database
Metals transfer heat via accumulated energy in the free electrons of the metal atoms, these electrons will collide with one another transferring their kinetic energy. This billiard like interaction will propagate throughout the metal until the energy is uniformly spread. Copper is usually considered the best thermal conductor on a thermal conductivity to price ratio. The only metal surpassing Copper is Silver with a thermal conductivity of 429.77 W/m-K. With this in mind, it would be to no surprise if the copper wire is found to have the have the highest temperature across all 200mm intervals and the highest degree of melted candles. Part Two of this experiment series will look at the variations in thermal conductivity due to length of a given material.
For further Information, visit:
https://thermtest.com/what-is-thermal-conductivity
https://thermtest.com/thermal-resources/energy2d-heat-transfer-simulations/
https://en.wikipedia.org/wiki/Thermal_conductivity